Fastai with 🤗Transformers (BERT, RoBERTa, XLNet, XLM, DistilBERT)
A tutorial to implement state-of-the-art NLP models with Fastai for Sentiment Analysis.
NB. This article was originally published here on Towards Data Science.
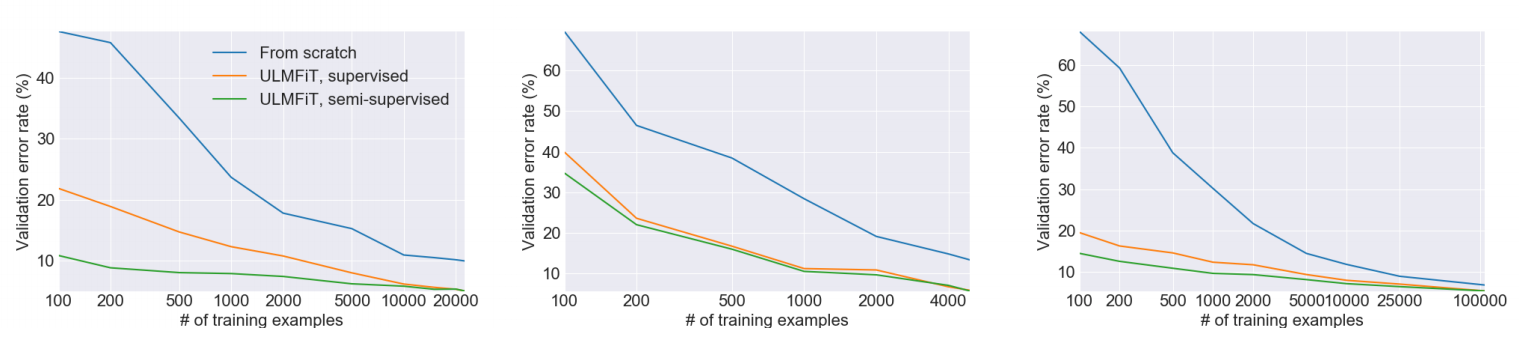
In early 2018, Jeremy Howard (co-founder of fast.ai) and Sebastian Ruder introduced the Universal Language Model Fine-tuning for Text Classification (ULMFiT) method. ULMFiT was the first Transfer Learning method applied to NLP. As a result, besides significantly outperforming many state-of-the-art tasks, it allowed, with only 100 labeled examples, to match performances equivalent to models trained on 100× more data.
The first time I heard about ULMFiT was during a fast.ai course given by Jeremy Howard. He demonstrated how it is easy — thanks to the fastai library — to implement the complete ULMFiT method with only a few lines of codes. In his demo, he used an AWD-LSTM neural network pre-trained on Wikitext-103 and get rapidly state-of-the-art results. He also explained key techniques — also demonstrated in ULMFiT — to fine-tune models like Discriminate Learning Rate, Gradual Unfreezing or Slanted Triangular Learning Rates.
Since the introduction of ULMFiT, Transfer Learning became very popular in NLP and yet Google (BERT, Transformer-XL, XLNet), Facebook (RoBERTa, XLM) and even OpenAI (GPT, GPT-2) begin to pre-train their own model on very large corpora. This time, instead of using the AWD-LSTM neural network, they all used a more powerful architecture based on the Transformer (cf. Attention is all you need).
Although these models are powerful, fastai do not integrate all of them. Fortunately, Hugging Face 🤗 created the well know transformers library. Formerly known as pytorch-transformers or pytorch-pretrained-bert, this library brings together over 40 state-of-the-art pre-trained NLP models (BERT, GPT-2, RoBERTa, CTRL…). The implementation gives interesting additional utilities like tokenizer, optimizer or scheduler.
The transformers library can be self-sufficient but incorporating it within the fastai library provides simpler implementation compatible with powerful fastai tools like Discriminate Learning Rate, Gradual Unfreezing or Slanted Triangular Learning Rates. The point here is to allow anyone — expert or non-expert — to get easily state-of-the-art results and to “make NLP uncool again”.
It is worth noting that integrating the Hugging Face transformers library in fastai has already been demonstrated in:
- Keita Kurita’s article A Tutorial to Fine-Tuning BERT with Fast AI which makes
pytorch_pretrained_bertlibrary compatible withfastai. - Dev Sharma’s article Using RoBERTa with Fastai for NLP which makes
pytorch_transformerslibrary compatible withfastai.
Although these articles are of high quality, some part of their demonstration is not anymore compatible with the last version of transformers.
🛠 Integrating transformers with fastai for multiclass classification
Before beginning the implementation, note that integrating transformers within fastai can be done in multiple ways. For that reason, I brought — what I think are — the most generic and flexible solutions. More precisely, I tried to make the minimum modification in both libraries while making them compatible with the maximum amount of transformer architectures. However, if you find a clever way to make this implementation, please let us know in the comment section!
A Jupiter Notebook version of this tutorial is available on this Kaggle kernel.
Libraries Installation
First, you will need to install the fastai and transformers libraries. To do so, just follow the instructions here and here.
For this demonstration, I used Kaggle which already has the fastai library installed. So I just installed transformers with the command :
pip install transformers
The versions of the libraries used for this demonstration are fastai 1.0.58 and transformers 2.1.1.
🎬 The example task
The chosen task is a multi-class text classification on Movie Reviews.
The dataset and the respective Notebook of this article can be found on Kaggle.
For each text movie review, the model has to predict a label for the sentiment. We evaluate the outputs of the model on classification accuracy. The sentiment labels are:
- 0 →Negative
- 1 →Somewhat negative
- 2 →Neutral
- 3 →Somewhat positive
- 4 →Positive
The data is loaded into a DataFrame using pandas.
Main transformers classes
In transformers, each model architecture is associated with 3 main types of classes:
- A model class to load/store a particular pre-train model.
- A tokenizer class to pre-process the data and make it compatible with a particular model.
- A configuration class to load/store the configuration of a particular model.
For example, if you want to use the BERT architecture for text classification, you would use BertForSequenceClassification for the model class, BertTokenizer for the tokenizer class and BertConfig for the configuration class.
Later, you will see that those classes share a common class method from_pretrained(pretrained_model_name, ...). In our case, the parameter pretrained_model_name is a string with the shortcut name of a pre-trained model/tokenizer/configuration to load, e.g bert-base-uncased. We can find all the shortcut names in the transformers documentation here.
In order to switch easily between classes — each related to a specific model type — I created a dictionary that allows loading the correct classes by just specifying the correct model type name.
It is worth noting that in this case, we use the transformers library only for a multi-class text classification task. For that reason, this tutorial integrates only the transformer architectures that have a model for sequence classification implemented. These model types are :
- BERT (from Google)
- XLNet (from Google/CMU)
- XLM (from Facebook)
- RoBERTa (from Facebook)
- DistilBERT (from Hugging Face)
However, if you want to go further — by implementing another type of model or NLP task — this tutorial still an excellent starter.
Data pre-processing
To match pre-training, we have to format the model input sequence in a specific format.
To do so, you have to first tokenize and then numericalize the texts correctly.
The difficulty here is that each pre-trained model, that we will fine-tune, requires exactly the same specific pre-process — tokenization & numericalization — than the pre-process used during the pre-train part.
Fortunately, the tokenizer class from transformers provides the correct pre-process tools that correspond to each pre-trained model.
In the fastai library, data pre-processing is done automatically during the creation of the DataBunch.
As you will see in the DataBunch implementation part, the tokenizer and the numericalizer are passed in the processor argument under the following format :
processor = [TokenizeProcessor(tokenizer=tokenizer,…), NumericalizeProcessor(vocab=vocab,…)]
Let’s first analyze how we can integrate the transformers tokenizer within the TokenizeProcessor function.
Custom tokenizer
This part can be a little confusing because a lot of classes are wrapped in each other and with similar names.
To resume, if we look attentively at the fastai implementation, we notice that :
- The
TokenizeProcessorobject takes astokenizerargument aTokenizerobject. - The
Tokenizerobject takes astok_funcargument aBaseTokenizerobject. - The
BaseTokenizerobject implement the functiontokenizer(t:str) → List[str]that takes a texttand returns the list of its tokens.
Therefore, we can simply create a new class TransformersBaseTokenizer that inherits from BaseTokenizer and overwrite a new tokenizer function.
In this implementation, be careful about 3 things:
- As we are not using RNN, we have to limit the sequence length to the model input size.
- Most of the models require special tokens placed at the beginning and end of the sequences.
- Some models like RoBERTa require a space to start the input string. For those models, the encoding methods should be called with
add_prefix_spaceset toTrue.
Below, you can find the resume of each pre-process requirement for the 5 model types used in this tutorial. You can also find this information on the Hugging Face documentation in each model section.
- BERT: [CLS] + tokens + [SEP] + padding
- DistilBERT: [CLS] + tokens + [SEP] + padding
- RoBERTa: [CLS] + prefix_space + tokens + [SEP] + padding
- XLM: [CLS] + tokens + [SEP] + padding
- XLNet: padding + [CLS] + tokens + [SEP]
It is worth noting that we don’t add padding in this part of the implementation.
As we will see later, fastai manage it automatically during the creation of the DataBunch.
Custom Numericalizer
In fastai, NumericalizeProcessor object takes as vocab argument a Vocab object.
From this analyze, I suggest two ways to adapt the fastai numericalizer:
- You can like described in Dev Sharma’s article (Section 1. Setting Up the Tokenizer), retrieve the list of tokens and create a
Vocabobject. - Create a new class
TransformersVocabthat inherits fromVocaband overwritenumericalizeandtextifyfunctions.
Even if the first solution seems to be simpler, transformers does not provide, for all models, a straightforward way to retrieve his list of tokens.
Therefore, I implemented the second solution, which runs for each model type.
It consists of using the functions convert_tokens_to_ids and convert_ids_to_tokens in respectively numericalize and textify.
Custom processor
Now that we have our custom tokenizer and numericalizer, we can create the custom processor. Notice we are passing the include_bos = False and include_eos = False options. This is because fastai adds its own special tokens by default which interferes with the [CLS] and [SEP] tokens added by our custom tokenizer.
Setting up the DataBunch
For the DataBunch creation, you have to pay attention to set the processor argument to our new custom processor transformer_processor and manage correctly the padding.
As mentioned in the Hugging Face documentation, BERT, RoBERTa, XLM, and DistilBERT are models with absolute position embeddings, so it’s usually advised to pad the inputs on the right rather than the left. Regarding XLNET, it is a model with relative position embeddings, therefore, you can either pad the inputs on the right or on the left.
Custom model
As mentioned here, every model’s forward method always outputs a tuple with various elements depending on the model and the configuration parameters. In our case, we are interested to access only to the logits.
One way to access them is to create a custom model.
To make our transformers adapted to multiclass classification, before loading the pre-trained model, we need to precise the number of labels. To do so, you can modify the config instance or either modify like in Keita Kurita’s article (Section: Initializing the Learner) the num_labels argument.
Learner : Custom Optimizer / Custom Metric
In pytorch-transformers, Hugging Face had implemented two specific optimizers — BertAdam and OpenAIAdam — that have been replaced by a single AdamW optimizer.
This optimizer matches Pytorch Adam optimizer Api, therefore, it becomes straightforward to integrate it within fastai.
Note that for reproducing BertAdam specific behavior, you have to set correct_bias = False.
Discriminative Fine-tuning and Gradual unfreezing
To use Discriminative Learning Rate and G_radual Unfreezing_, fastai provides one tool that allows to “split” the structure model into groups. An instruction to perform that “split” is described in the fastai documentation here.
Unfortunately, the model architectures are too different to create a unique generic function that can “split” all the model types in a convenient way. Thereby, you will have to implement a custom “split” for each different model architecture.
For example, if we use the DistilBERT model and that we observe his architecture by making print(learner.model). We can decide to divide the model in 8 blocks :
- 1 Embedding
- 6 transformer
- 1 classifier
In this case, we can split our model in this way:
Note that I didn’t found any document that has studied the influence of Discriminative Learning Rate and Gradual Unfreezing or even Slanted Triangular Learning Rates with transformer architectures. Therefore, using these tools does not guarantee better results. If you found any interesting documents, please let us know in the comment.
Train
Now we can finally use all the fastai build-in features to train our model. Like the ULMFiT method, we will use Slanted Triangular Learning Rates, Discriminate Learning Rate and gradually unfreeze the model.
Therefore, we first freeze all the groups but the classifier with :
learner.freeze_to(-1)
For Slanted Triangular Learning Rates you have to use the function fit_one_cycle. For more information, please check the fastai documentation here.
To use our fit_one_cycle we will need an optimum learning rate. We can find this learning rate by using a learning rate finder, which can be called by using lr_find. Our graph would look something like this:

We will pick a value a bit before the minimum, where the loss still improves. Here 2x10⁻³ seems to be a good value.
learner.fit_one_cycle(1,max_lr=2e-03,moms=(0.8,0.7))
The graph of the loss would look like this:

We then unfreeze the second group and repeat the operations until all the groups are unfrozen. If you want to use Discriminative Learning Rate you can use slice as follow :
To unfreeze all the groups, use learner.unfreeze().
Creating prediction
Now that we have trained the model, we want to generate predictions from the test dataset.
As specified in Keita Kurita’s article, as the function get_preds does not return elements in order by default, you will have to resort the elements into their correct order.
In the Kaggle example, without playing too much with the parameters, we get a Public Score of 0.70059, which leads us to the 5th position on the leaderboard!
📋Conclusion
In this article, I explain how to combine the transformers library with the beloved fastai library. It aims to make you understand where to look and modify both libraries to make them work together. Likely, it allows you to use Slanted Triangular Learning Rates, Discriminate Learning Rate and even Gradual Unfreezing. As a result, without even tunning the parameters, you can obtain rapidly state-of-the-art results.
This year, the transformers became an essential tool for NLP. Because of that, I think that pre-trained transformers architectures will be integrated soon to future versions of fastai. Meanwhile, this tutorial is a good starter.
I hope you enjoyed this first article and found it useful. Thanks for reading and don’t hesitate in leaving questions or suggestions.
I will keep writing articles on NLP so stay tuned!
📑 References
[1] Hugging Face, Transformers GitHub (Nov 2019), https://github.com/huggingface/transformers
[2] Fast.ai, Fastai documentation (Nov 2019), https://docs.fast.ai/text.html
[3] Jeremy Howard & Sebastian Ruder, Universal Language Model Fine-tuning for Text Classification (May 2018), https://arxiv.org/abs/1801.06146
[4] Keita Kurita , A Tutorial to Fine-Tuning BERT with Fast AI (May 2019)
[5](undefined), Using RoBERTa with Fastai for NLP (Sep 2019)
Comments